

cdn.shieldlabs.ai.
The API shape is identical in every environment. A webhook from a development domain and a webhook from a production domain carry the same fields, the same request_id join key, and the same Risk Score (0-100) with its signals. Nothing about the integration changes between environments except the domain and its credentials.
One thing changes per environment
The domain and its key set
Register a separate domain for each environment (for example
dev.example.com and example.com). Each domain gets its own Public Key, Private API Key, Secret Key and webhook endpoints. Every environment loads the snippet from cdn.shieldlabs.ai.Use a separate domain and key set per environment
Register each environment as its own domain in the analytics dashboard. Every domain you add gets its own Public Key, Private API Key and Secret Key and its own webhook endpoints. A development domain uses one of your plan’s domain slots: Free and Starter allow 1 domain, Growth 3, Scale 5. On Free and Starter the development domain takes your only slot, so delete it before you add the production domain; deleting a domain frees its slot right away.
Keeping them separate buys you:
- Clean data. Development traffic stays on its own domain, so when you pick your production domain in the analytics dashboard’s domain picker instead of All domains, its users, devices, High-Risk Events and traffic sources reflect live traffic only.
- Isolated webhooks. Each domain registers its own webhook endpoints, so test deliveries hit your local handler and never your production endpoint.
- One shared quota. Identifications on the development domain count against your account’s included identifications like any other, so keep test traffic small. Billing is per identification.
- Blast-radius control. A leaked development secret cannot call the Server API for your production domain. Keys are scoped to a single domain. Webhook
whsec_…secrets are scoped per endpoint.
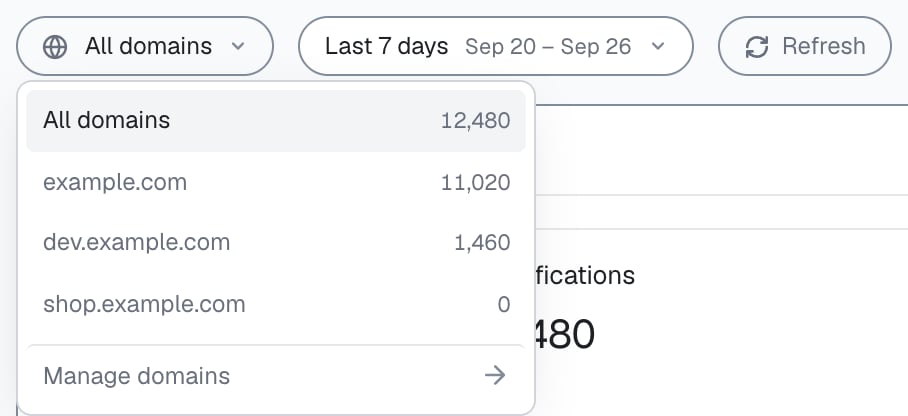
Pick the period and one domain or all domains in the analytics dashboard.
Wire the keys through config
Load the Public Key from environment config instead of hardcoding it, so the same build runs in both environments. Keep the Private API Key (for History API reads) and the Secret Key (for the Management API) server-side only, and store each webhookwhsec_… for signature verification. None of them may reach the browser.
ShieldLabsTracker.jsx
Your Content-Security-Policy is the same in every environment:
https://cdn.shieldlabs.ai in script-src, and https://rest.shieldlabs.ai, wss://rest.shieldlabs.ai, https://webrtc.shieldlabs.ai and stun:ice.shieldlabs.ai:3478 in connect-src. If the page includes the <noscript><img> beacon, also allow https://rest.shieldlabs.ai in img-src. If a policy blocks https://webrtc.shieldlabs.ai, identifications still arrive but can carry the stun_not_checked risk signal (weight 30).Receiving webhooks in development
Your development webhook needs a publicly reachable URL. Run a tunnel to your local server and register it as an endpoint for the development domain under Integration > Webhooks in the analytics dashboard:https://abc123.ngrok.app/webhooks/shieldlabs as an endpoint in the analytics dashboard, copy that endpoint’s whsec_… secret into SHIELDLABS_WEBHOOK_SECRET, and verify X-Shield-Signature exactly as you will in production. The Webhooks guide carries the verification logic, the single webhook per scored identification (ShieldLabs waits for follow-up network checks, at most about 10 seconds, then sends the final Risk Score once), and the at-most-once delivery caveat.
Test with real traffic before production
Risk Scores reflect the actual connection and browser environment of whoever loads the page, so the most useful test is real traffic on a real development domain, not synthetic requests.1
Deploy the snippet on a development domain
Register
dev.example.com, load the snippet with the development domain’s Public Key on a staging or preview deployment, and let real traffic flow through it. Pick a hostname that resolves in public DNS, such as a staging or preview subdomain: adding a domain checks that the hostname exists, and a page served from localhost has no registered domain to match, so its identification calls get 401.2
Watch the data land
Confirm identifications appear under your development domain in the analytics dashboard and that webhooks reach your tunnel. Sign in with a test account so the identifications carry a User HID, and check that
user_hid arrives on the webhook. Check the signals array to see which risk signals fired and why. Within one visit, the snippet runs at most one identification every five minutes for the same user; call forceCheckAnonymous or forceCheckAuthenticatedUser when a test needs a new identification on demand.3
Check your actions against the bands
Choose the action for each band (Trusted 0-29, Suspicious 30-59, Dangerous 60-100) and verify the behavior on this real traffic, the way acting on results lays out.
4
Promote to production
Swap the keys to the production domain’s key set through config (on Free and Starter, delete the development domain first so the production domain has a slot). Nothing else in your code changes.
Read a high Risk Score together with its named risk signals and the user’s history. A real customer on a corporate VPN can reach the Suspicious band; the signals show why, and you choose the action for each case. Testing with real traffic on a development domain shows you that distribution before you act on it.
Promotion checklist
Public Key
Public Key
Use the production domain’s Public Key in the snippet URL.
Private API Key
Private API Key
Load the production Private API Key on your server for History API reads. It must never reach the browser.
Secret Key
Secret Key
Load the production Secret Key on your server for Management API auth on
api.shieldlabs.ai. It must never reach the browser.Webhook endpoints
Webhook endpoints
Register production webhook endpoints for the production domain under Integration > Webhooks, not your development tunnel.
Webhook signing secrets
Webhook signing secrets
Copy each production endpoint’s
whsec_… into your server environment for webhook verification.CSP
CSP
Confirm your production Content-Security-Policy carries every ShieldLabs host in
script-src and connect-src.Next steps
API keys
Where each key lives and why server keys never ship to the browser.
Domains
Register a domain per environment and manage its webhook endpoints.
Webhooks
Verify
X-Shield-Signature and handle the single scored webhook per identification.Acting on results
Choose the action for each band: allow, step up, review or block.