

X-Shield-Signature header, and choose the action for each case in your backend.
This page is the how-to. The Webhooks API reference has the exact field-by-field payload schema.
Webhooks are optional. If you do not register an endpoint, identifications still run and still count against your plan, and their results are in the analytics dashboard and the History API. An endpoint is what makes results real-time.
Register an endpoint
You can configure up to 10 endpoints per domain. Each endpoint has its own name, HTTPS URL, and a unique signing secret (whsec_…). Manage them in the analytics dashboard under Integration > Webhooks.
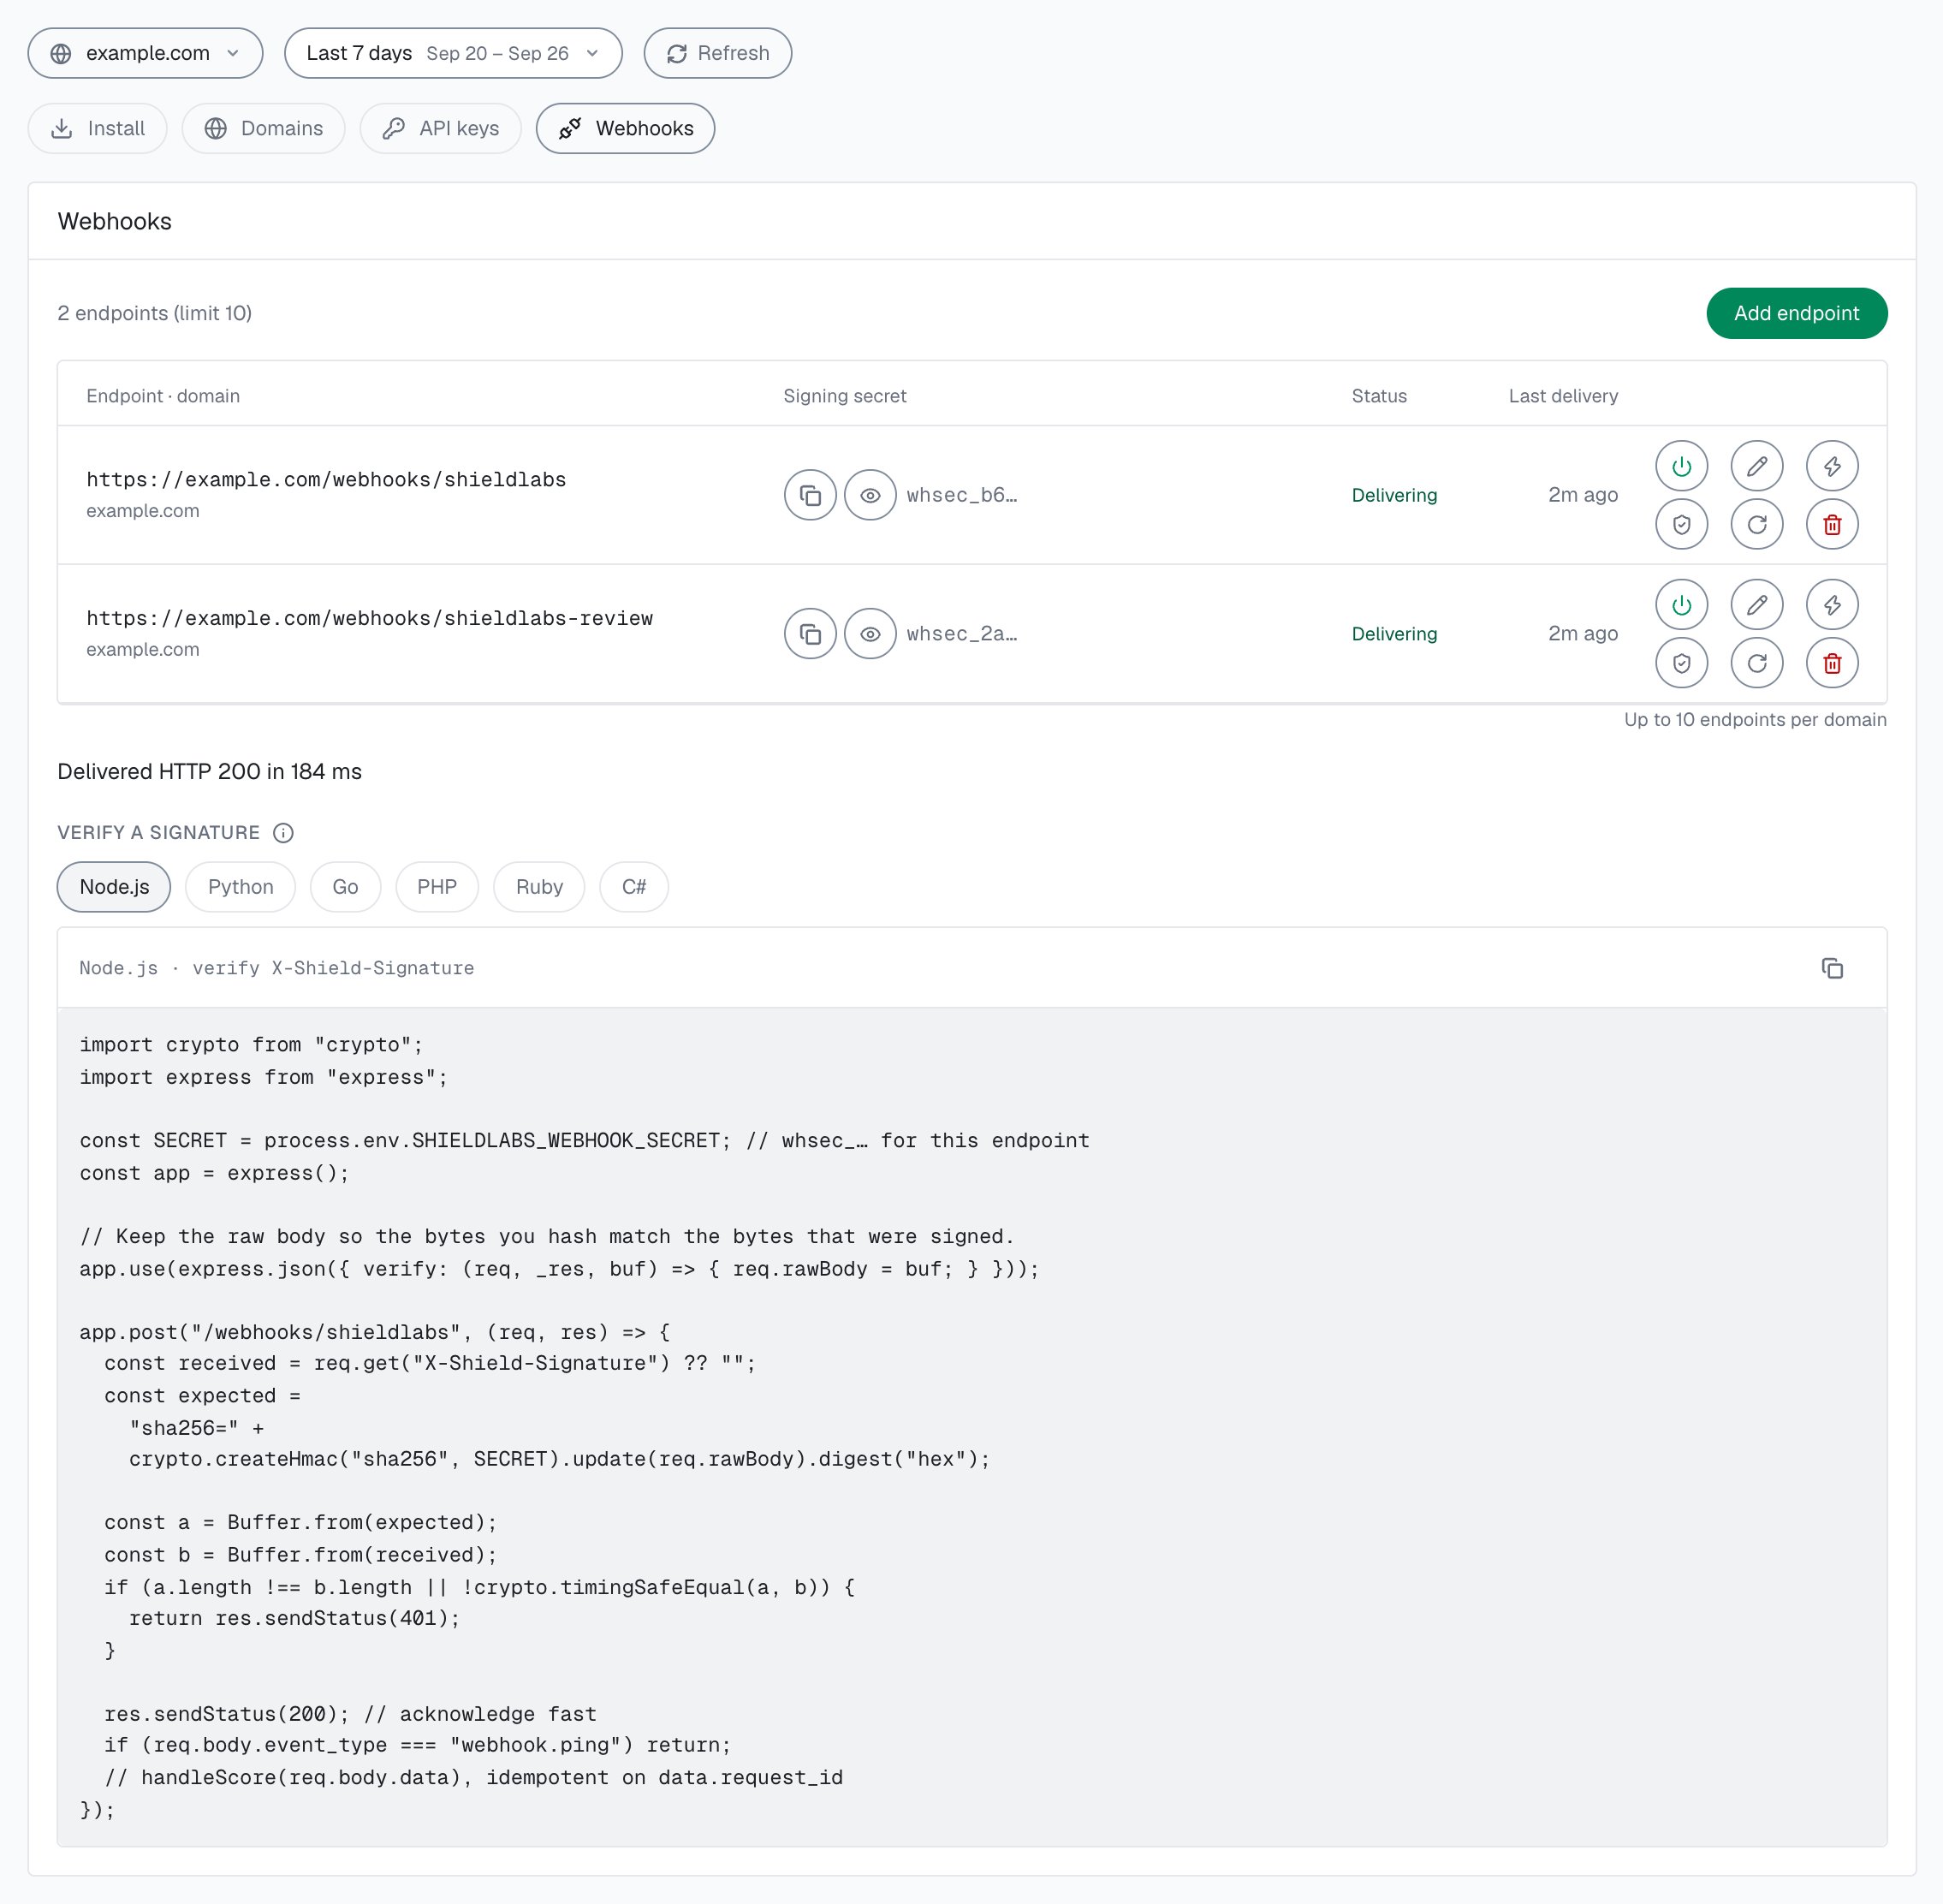
Integration > Webhooks in the analytics dashboard: each endpoint has its own signing secret, Verify and Test.
1
Open Integration
In the analytics dashboard, open Integration > Webhooks and select your domain. Integration describes the screen.
2
Add an endpoint
Click Add endpoint, give it a name and a public HTTPS URL on a route your backend controls, and save. ShieldLabs generates a dedicated signing secret (
whsec_…) for that endpoint.3
Verify it
Use Verify to send a signed
webhook.ping. When your endpoint answers with a 2xx, its status changes from Waiting for the first event to Delivering. Use Test on the endpoint to send a sample identification.scored delivery at any time; the row shows the result, for example “Delivered HTTP 200 in 84 ms”. The test sample always carries the same request_id and a null user_hid, so a handler that deduplicates on request_id processes it once.whsec_… for one endpoint and invalidates the old one.
What a delivery looks like
ShieldLabs sends aPOST with Content-Type: application/json to each enabled endpoint. The body is a signed envelope (snake_case), and the signature travels in the X-Shield-Signature header.
data.request_id. The full field list is in the Webhooks API reference.
This identification is masked: data.public_ip is a US proxy exit (203.0.113.42) while data.local_ip is the address the browser itself reports, in Germany (198.51.100.23). The two addresses differ, so data.detection_flags.ip_mismatch is true. ShieldLabs returns both IPs so you can compare them; compare the two countries rather than branching on the flag. The difference is informational and adds nothing to the Risk Score, which here comes from the proxy, datacenter and abuser signals.
Branch on
data.risk_score, signal name slugs and detection_flags. A slug can appear more than once with a partial weight, so never assume one entry per slug.Tie deliveries to your users
Eachidentification.scored delivery is one identification, the event layer under your users. Store data.user_hid (your hashed User HID, or "anonymous" for a checkAnonymous call), data.device_id, data.visitor_id and the IPs in data.public_ip and data.local_ip with your own records, so you can act on the user and not only on this identification. The History API returns every identification of one user, device, visitor or IP by user_hid, device_id, visitor_id or ip. High-Risk Events are available in the analytics dashboard, the API and webhooks; when one arrives for a user, act on the account.
One webhook per identification
Each identification produces exactly one scored webhook per enabled endpoint, joined byrequest_id.
ShieldLabs waits for follow-up network checks when they apply to the identification. The webhook is sent as soon as those checks finish, or at most about 10 seconds after the check, whichever comes first. If a follow-up never arrives, you still get one webhook with the best Risk Score available at that point.
Typical timing:
- Identifications without a follow-up network check: about 300 ms after the check.
- Chrome with a follow-up network check: usually within a few seconds, at most about 10 seconds.
Verify the signature
Every delivery is signed. TheX-Shield-Signature header is the hex-encoded HMAC-SHA256 of the raw request body, keyed with that endpoint’s signing secret, prefixed with sha256=:
sha256=, and compare it to the X-Shield-Signature header using a constant-time comparison. Reject the request (respond 401) on a mismatch, and do not process the body.
Under Integration > Webhooks in the analytics dashboard, Verify a signature has the same check ready to copy in six languages.
Delivery guarantees
Webhook delivery is at-most-once. A practical handler pattern:1
Verify
Constant-time compare the
X-Shield-Signature header. Reject with 401 on a mismatch.2
Acknowledge
Return
200 immediately once the signature is valid and the body is parsed.3
Deduplicate
Upsert on
request_id. A redelivery for the same id should be a no-op.4
Act
Store the identification against
data.user_hid and data.device_id, then choose the action for each case (allow, step up, review or block) from data.risk_score and data.signals.Next steps
Webhooks API reference
Field-by-field payload schema, timing, and signature details.
Acting on results
Choose the action for each band: allow, step up, review or block.
History API
Read one identification, or every identification of one user, for guaranteed reads.
API keys
Where your Public Key, Private API Key and Secret Key come from.